
In the world of academic writing, formatting is fundamental to effectively communicating ideas. While there are many formatting techniques to consider, one powerful tool often overlooked is the hanging indent. This simple indentation style, commonly seen in reference lists and bibliographies, has the remarkable ability to increase the visual appeal and organization of your writing. Academic writers can create a more reader-friendly experience when effectively using hanging indent, ensuring that their work is presented in a clear and structured manner. In this article, we will explain the significance of the hanging indent, learn how to implement it, and explore how this technique can elevate the quality of your writing.
What Is A Hanging Indent?
A hanging indent is a text formatting style where all paragraph lines, except the first line, are indented. The subsequent lines drop to the right of the previous line, leaving a short space on the left. It is commonly used in reference lists, such as in APA, Chicago style, and MLA, to separate and differentiate between different sources. In terms of appearance, a hanging indent is typically five spaces or 1/2 inch from the left margin, with the first line aligned with the left margin and subsequent lines indented. This indentation style helps maintain alignment and enhances readability, not only in reference lists but also in bulleted and numbered lists. Overall, a hanging indent is a visual cue for easy reference and focuses on authors’ names in a bibliography or reference section.
Creating A Hanging Indent In Microsoft Word
To create a hanging indent in Microsoft Word, you can follow these steps:
- Open Microsoft Word and navigate to the document where you want to make the hanging indent.
- Select the paragraph or paragraphs you want to format with a hanging indent. You can click and drag your cursor to highlight the desired text, or you can use Ctrl+A to select the entire document.
- On the top menu, go to the “Home” tab.
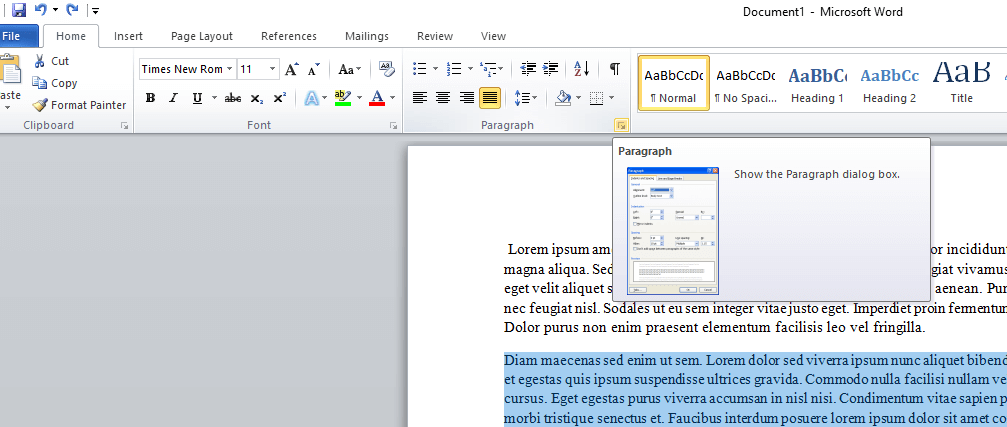
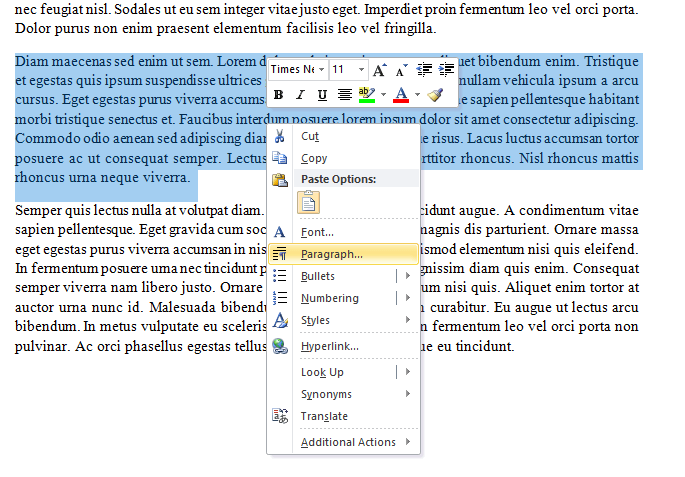
- Locate the “Paragraph” section in the toolbar. It usually appears on the right side of the “Home” tab or, for a short way, right-click and choose “Paragraph”.
- Look for the small arrow in the bottom-right corner of the “Paragraph” section and click on it. This will open the “Paragraph” dialog box.
- In the “Paragraph” dialog box, you should see the “Indentation” section. Under “Special,” select “Hanging” from the drop-down menu.
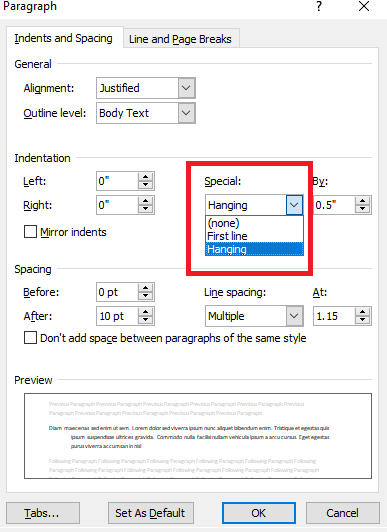
- Set the desired indentation measurements for the hanging indent. You can adjust the “By” value to determine how far the subsequent lines will be indented. Typically, a hanging indent is set to around 0.5 inches (1.27 cm) or according to the formatting guidelines you are following.
- Click “OK” to apply the hanging indent formatting to the selected paragraphs.
The selected paragraphs will now have a hanging indent, with the first line starting at the left margin and subsequent lines indented inward. The hanging indent can be modified or removed by following the same steps and adjusting the settings in the “Paragraph” dialog box.
Creating A Hanging Indent In Google Docs
To create a hanging indent in Google Docs, you can follow these steps:
- Open Google Docs and navigate to the document where you want to create the hanging indent.
- Select the paragraph or paragraphs you want to format with a hanging indent. You can click and drag your cursor to highlight the desired text, or you can use Ctrl+A (Windows) or Command+A (Mac) to select the entire document.
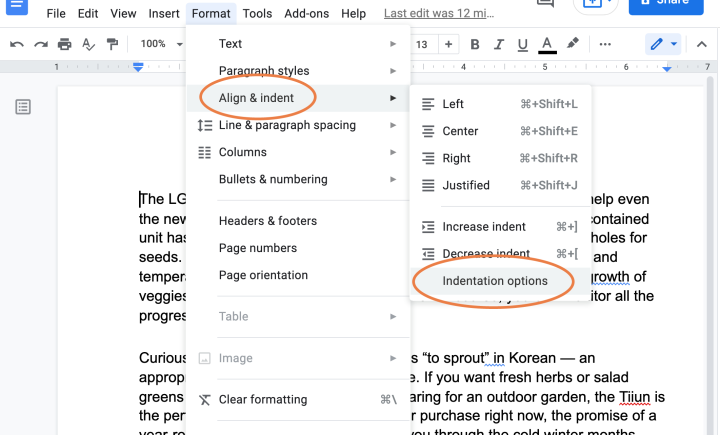
- On the top menu, go to the “Format” tab.
- Hover over the “Align & Indent” option in the menu.
- In the sub-menu that appears, click on “Indentation options.”
- In the “Indentation” dialog box that opens, locate the “Special indent” section.
- Under “Special indent,” select “Hanging” from the drop-down menu.
- Set the desired indentation measurements for the hanging indent. You can adjust the “By” value to determine how far the subsequent lines will be indented. Typically, a hanging indent is set to around 0.5 inches (1.27 cm) or according to the formatting guidelines you are following.
- Click “Apply” to apply the hanging indent formatting to the selected paragraphs.
The selected paragraphs will now have a hanging indent, with the first line starting at the left margin and subsequent lines indented inward.
You can modify or remove the hanging indent by following the same steps and adjusting the settings in the “Indentation” dialog box.
Hanging Indent In Google Slides (Keyboard Shortcut)
In Google Slides, you can create a hanging indent using a keyboard shortcut. Follow these steps:
- Open your presentation in Google Slides.
- Select the text you want to apply a hanging indent to.
- Press the “Shift” key + Enter.
- Press the Tab key.
- The selected text will now have a hanging indent, with subsequent lines indented from the left margin.
Using the keyboard shortcut “Ctrl+Shift+M” (or “Cmd+Shift+M” on Mac) allows you to quickly and easily create a hanging indent in Google Slides without needing to access the formatting options manually.
Hanging Indents In Reference Lists
Hanging indents are widely used in various citation styles, such as APA (American Psychological Association), MLA (Modern Language Association), and Chicago style. These styles have specific guidelines for hanging indents, including the indentation size, such as half an inch or five spaces from the left margin.
By using hanging indents in reference lists, researchers, writers, and students can create a consistent and professional-looking document that adheres to the formatting standards of the chosen citation style. It allows for easy scanning and locating of specific references within the list.
MLA Hanging Indent
In MLA (Modern Language Association) style, a hanging indent is a specific formatting style used in the works cited page or bibliography. It is applied to each entry to make the citation more readable and organized. The hanging indent is characterized by indenting the second and subsequent lines of each citation, while the first line remains flush with the left margin.
To create a hanging indent in MLA style, follow these guidelines:
- Begin with the first line of the citation aligned with the left margin.
- Indent the second and subsequent lines of each citation by 0.5 inches or five spaces from the left margin.
- Maintain this indentation for all entries in the works cited page or bibliography.
- Double-space the entire works cited page, including both within and between citations.
The hanging indent helps readers quickly identify and differentiate between different citations, making it easier to locate specific sources. It is important to ensure consistent use of the hanging indent throughout your works cited page to maintain a professional and organized appearance.
Here’s an example of an MLA Works Cited Page with hanging indentation:
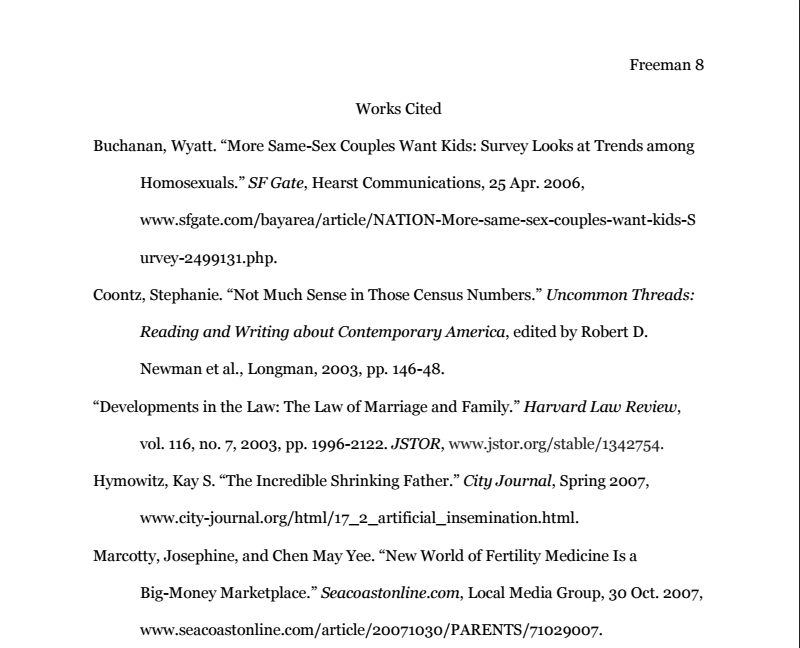
Always consult the MLA style guide or the guidelines provided by your instructor for specific instructions on formatting and citation requirements.
APA Hanging Indent
In APA (American Psychological Association) style, a hanging indent is a specific formatting style used in the reference list or bibliography. It is applied to each entry to enhance readability and organization. The hanging indent is characterized by indenting the second and subsequent lines of each reference, while the first line remains flush with the left margin.
To create a hanging indent in APA style, follow these guidelines:
- Start with the first line of the reference aligned with the left margin.
- Indent the second and subsequent lines of each reference by 0.5 inches or five spaces from the left margin.
- Maintain this indentation for all entries in the reference list.
- Double-space the entire reference list, including both within and between references.
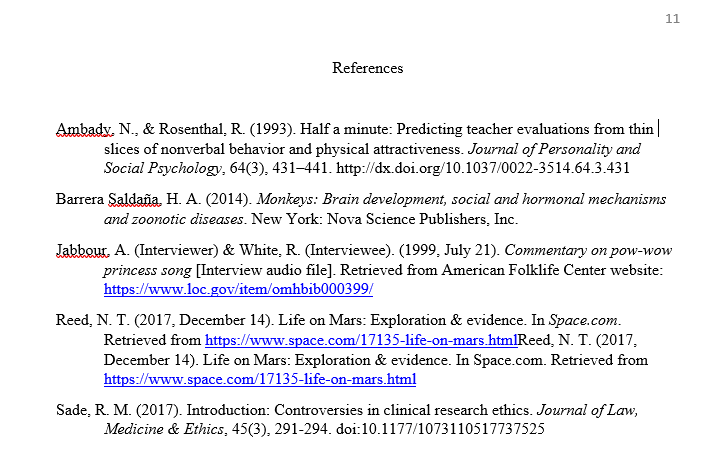
Always consult the APA style guide or the guidelines provided by your instructor for specific instructions on formatting and citation requirements.
Visually Appealing Figures For Your Research
Mind the Graph supports scientists in creating visually appealing figures for their research. It provides a wide range of customizable scientific illustrations, templates, and design tools, allowing researchers to create engaging visuals that effectively communicate their findings. With the ability to integrate data into graphs and customize colors, fonts, and styles, scientists can personalize their figures to match their research style and create the visual impact of their work, making it more accessible and memorable to a broader audience.


Subscribe to our newsletter
Exclusive high quality content about effective visual
communication in science.