A great part of the scientist’s routine is to design and perform experiments.
The combination of laboratory techniques will answer most of the questions proposed by scientists, and the workflow to suggest new methods depends on the scientist’s background and experience.
For biologists, cell images can say a lot about what’s going on with the processes and mechanisms they are studying.
Light microscopy is a very widespread technique in biological sciences.
The use of dyes, antibodies, and fluorescent probes allows scientists to see in the microscope cells images of what was otherwise too small to be seen and even comprehended.
Fluorescence microscopes and the use of fluorochromes became possible in 19301, and today many combinations of fluorochromes are possible to stain proteins, organelles, and structures within cells and tissues.
Fluorochromes (or fluorophores) are molecules that when excited with a specific wavelength of light, emit light of a defined wavelength that will be captured by the lenses of a microscope, and transformed into an actual image.
The combination of fluorescence, lenses, and cameras enables us to take an image of processes inside cells in many different views and aspects.
For example, using the microscope, we have a broader view of a mouse brain slice in a 2,5x or 4x objective, and small details of the probed actin cytoskeleton in the same sample using a 63x objective.
To enable these assays, we can use antibodies or dyes against specific proteins present in the cell or tissue, and the antibody usually comes with a fluorophore.
Stokes’ shift explains this phenomenon: fluorophores lose vibrational energy in the form of emitted light when they change from an excited state back to the ground state. Fluorescence microscopes will provide the light to excite the fluorophore, and receive its emitted light. The emitted light can be captured by a lens, processed inside a CCD camera, and transformed into a digital image.
But let’s talk about cell image acquisition later. Now, we should introduce you to examples and tips for the main steps before acquiring your image.
How do we choose and combine different types of dyes and antibodies, to see and understand relationships between organelles and proteins inside cells or tissues?
First, scientists need to determine which antibodies and dyes to use based on their research.
For example, in this article, Mendonça was trying to evaluate the effects and potential risks of cationic solid lipid nanoparticles (cSLNs) in rats. Many nanoparticles are developed and studied every year, aiming to enhance the delivery of drugs or genes to treat many diseases. One of the interesting questions in this study was if the nanoparticles were able to reach the brain by crossing the blood-brain barrier. This barrier protects our brain from circulating toxins or pathogens, and usually, it’s not desirable to have molecules crossing the barrier. But in this particular case, Mendonça’s goal was for the nanoparticles to cross the barrier and reach the brain, to deliver drugs or genes in a future application.
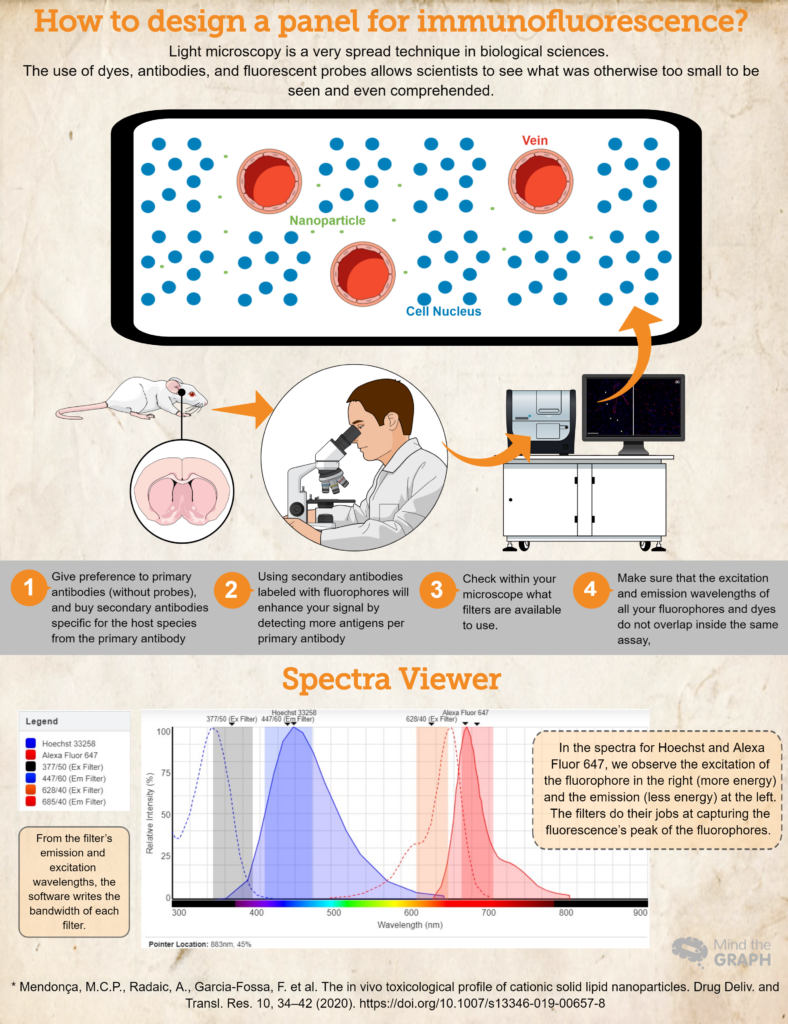
Willing to see if the nanoparticles were present in the brain parenchyma, the authors used an endothelial cell marker for the vessels called RECA-1 (represented in red), while cell nuclei were stained with a dye called DAPI (4′,6-diamidino-2-phenylindole) which is blue. We can also observe little green dots for the nanoparticles outside the vessels, which means they reached the brain parenchyma.
Check out the infographic below with a representation image.
Let’s understand what the antibody for RECA-1 (red) is doing.
These antibodies are designed to serve as specific probes, and they target a specific antigen (in our case, the protein RECA-1).
They can be labeled with a fluorophore or recognized later by a secondary antibody linked to a fluorophore.
Therefore, after exciting the sample with a light source, the specific protein you are looking for will be recognized in your sample by the emission of light in a specific wavelength.
In the case of DAPI, this dye is nuclei and nucleosome counterstain, and it emits blue fluorescence when binding to AT regions of the DNA.
How to design a panel for immunofluorescence?
Start with these steps:
- Buy (or borrow! Science should be very collaborative!) antibodies and dyes essential for your research. Give preference to primary antibodies (without probes), and buy secondary antibodies specific for the host species from the primary antibody. For example, if using a primary antibody produced in rabbits, use a secondary antibody for anti-rabbit. This will guarantee specificity.
- Using secondary antibodies labeled with fluorophores will enhance your signal by detecting more antigens per primary antibody. Also, this is a more dynamic way to elaborate on different assays, because it allows the researcher to modify the colors in the panel based on her needs.
- Another important step is to check within your microscope what filters are available to use. You should make sure that your fluorophore excitation and emission wavelengths lie inside the excitation and emission filters; otherwise, you will not be able to capture the emission light from your probes. You can use Fluorescence Spectra Viewer to check the compatibility.
- To make sure that the excitation and emission wavelengths of all your fluorophores and dyes do not overlap inside the same assay, Fluorescence Spectra Viewer is a great choice. They cover almost all the fluorophores available!
Finally, check an example for a hypothetical experiment where we have Hoechst 33258 for the nucleic acids, and a primary antibody against RECA-1 labeled with a secondary antibody Alexa Fluor 647.
Ideally, we would use a microscope available with a DAPI cube (excitation 377/50 and emission 447/60), and a CY5 cube (excitation 628/40 and emission 685/40). All this information we inserted at Fluorescence Spectra Viewer and obtained the spectra for both of the dyes, and the bandwidths for both of the cubes (check out the spectrum in the infographic above).
This hypothetical essay is a good example where the spectra of the fluorophores belong inside the excitation and emission filters, making it possible for the researcher to capture his samples in the best way possible.
Now, it’s time to go to the lab and put everything into practice!
I hope these tips help you in your next lab experiment. Good luck!
References:
- Introduction to Fluorescence Microscopy. Nikon’s MicroscopyU https://www.microscopyu.com/techniques/fluorescence/introduction-to-fluorescence-microscopy. Accessed 2021-04-11 17:20:40.

Subscribe to our newsletter
Exclusive high quality content about effective visual
communication in science.


